Configuring the Clarify Connector in Harmony
This Clarify Connector in Harmony is used to integrate inbound and outbound file transfers directly with Cleo Clarify. The inbox and outbox of each Cleo Harmony/VLTrader host to be integrated with Clarify must point to an instance of this connector.
As part of Clarify integration, at least one Clarify Connector must be configured in Harmony. Even for the multi-server Clarify Cluster configuration, only one Connector is needed. However you may wish to create Connectors for each server environments, such as a dedicated Development server and a Production server, etc.
-
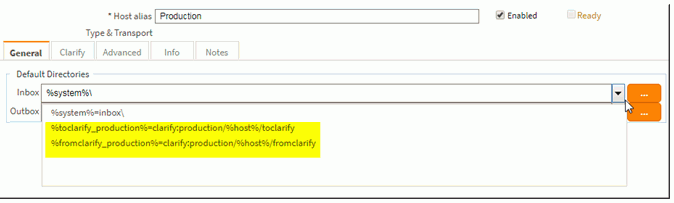
In the Host alias field, rename your new Clarify connector. Provide a
descriptive name, such as “production”, “dev”, “test”, etc.

-
An optional but recommended step is to define Clarify Connector directory
structures using custom directory variables. This allows you to define these
structures once, and then have them available for selection from the
Inbox and Outbox pull-down menus in any Harmony
Connection.
To create custom directory variables:
- (For Web UI): go to Administration > File System > Directories
-
(For native UI): select Configure > Options in the menu bar (or click Options in the toolbar)
To send files to Clarify, the required directory structure is as follows:
clarify:<Clarify_Connector_Alias>/%host%/toclarify
To receive files from Clarify, the required directory structure is as follows:
clarify:<Clarify_Connector_Alias>/%host%/fromclarify
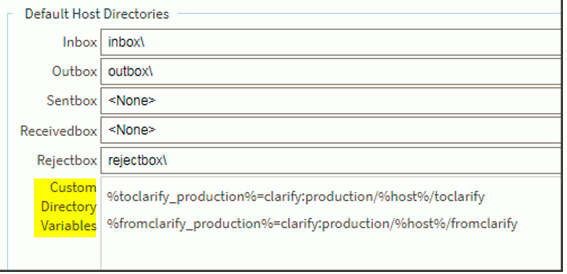
After creating and saving the custom variables in the above example, they would now be options for the Connector Inbox and Outbox drop-down menus.
Next Steps: Configure an AS2 host, an FTP host or an inbound listener to reference your Clarify connector. The Clarify Connector only supports the AS2, FTP, and SFTP protocols to the extent that Cleo Dashboards will associate the file flow between Cleo Harmony/VLTrader and Cleo Clarify. By configuring the Inbox /Outbox of your host, you are setting it to reference custom directory variables to then reference the Clarify Connector, which will move data between Clarify.
The example below shows how a host (as2_to_clarify) has been configured to include server address and inbox and outboxes directories. Once configured, the inbox references a Custom Directory Variable which references a Clarify Connector, which will send data to Clarify.

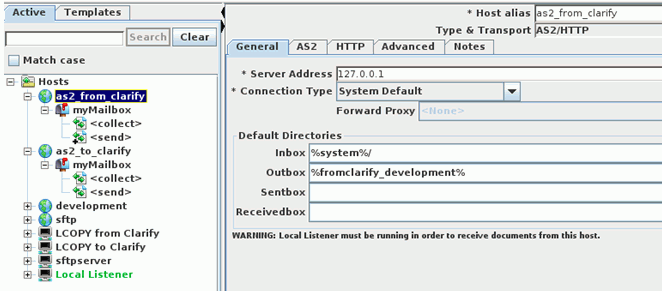
The example below shows how a host (as2_from_clarify) has been configured to include server address and inbox and outboxes directories. Once configured, the outbox references a Custom Directory Variable which references a Clarify Connector, which will receive data from Clarify.