Use this object to define delimiters and characters for source and target Flat File
and EDI documents, validation rules for XML and EDI integrations, as well as general
debugging settings.
If you haven't already created this object, see
Creating Transformation Settings.
The Transformation Settings
editor has these sections: General, Source Connector, and Target
Connector. The two Connector sections are further broken down by Flat
File, EDI, and Miscellaneous.
Flat
File
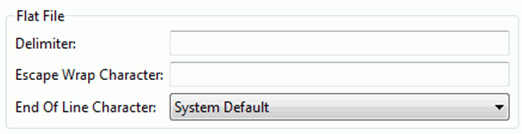
To set the delimiter for a delimited Flat File, type the delimiter
or character per your source or target document requirements in the Delimiter
field. For example, if your source delimited Flat File uses a comma as the
delimiter, then you would type a comma in Delimiter field under the Source
Connector's Flat File section.
To set the wrap character to be
used for enclosing a Flat File field, type the character in the Escape Wrap
Character field. Clarify supports the use of double and single quotation
marks ( " and ') as accepted wrap characters.
To set the
end
of line character for target flat file, choose from these drop-down
options:
- System Default: the actual value that is determined by the JVM system
properties; this will be either be a carriage return, line feed, or carriage
return/line feed.
- Carriage Return (actual value = \r)
- Line Feed (actual value = \n)
- Carriage Return/Line Feed (actual value = \r\n)
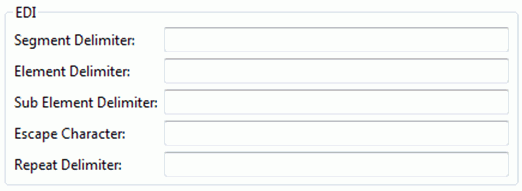
EDI documents are handled by the EDI
Enveloper object, so there are generally no steps necessary in the
Transformation Settings object. To set the wrap character to be used for
enclosing an EDI field, use the Escape Character
field.
Misc

To set the Decimal Separator, enter the
decimal mark type to be used.
Note: When specified, the Decimal Separator is used before the System Locale
(determined by the JVM system properties), specified Locale (set from the
Transformation Settings, see below), or the default Decimal Mark, which is the
period (Full Stop).
To set the
Locale, enter a valid IETF language tag (for example: en
for English, pt-BR for Brazilian Portuguese). This setting applies to EDI or Flat
file integrations only.
Note: When specified, Clarify uses this locale setting
before the default Decimal Mark, which is the period (Full Stop). If Locale is
not specified, then Clarify uses the System Locale (determined by the JVM system
properties). By selecting the Use Default System Locale checkbox, you not
only instruct Clarify to use the System Locale but also disable the specified
Locale field.
Enable Validation
-
To setup and manage internal validation (for XML and EDI syntax categories),
select the Enable validation checks checkbox. This activates the
validation type drop downs, which provide the following validation rule options:
- Validation Required: checks if mandatory fields are present in
the data.
- Validate Minimum Length: checks data length; corresponds to the
Minimum Length attribute on the Properties tab on each node in
the Schema.
- Validate Maximum Length: indicates whether or not to check
maximum node content length, in the source or target data; corresponds
to the Maximum Length attribute on the Properties tab on each
node in the Schema.
- Validate Minimum Occurs: indicates whether or not to check the
minimum number of occurrences of nodes, in the source or target data;
corresponds to the Minimum Occurs attribute in the Constraints
tab on each node in the Schema
- Validate Maximum Occurs: indicates whether or not to check the
maximum number of occurrences of nodes, in the source or target data;
corresponds to the greater of Maximum Occurs and Unbounded attributes in
the Constraints tab on each node in the Schema.
- Validate Data Type: indicates whether or not to verify each
node's contents with respect to the stated Data Type attribute, in the
source or target data. It corresponds to the Data Type attribute on the
Properties tab of each node in the schema; it should be noted
that each Data Type reduces to one of three basic types: String,
Boolean, and Numeric. There is no checking beyond that, so for example,
because a “Date” Data Type reduces to a String “base type”, Clarify does
not verify that the content is a valid date, only that the content is
valid String content.
- Validate Allowed Values: indicates whether or not to check the
content of each applicable node against the stated list of Allowed
Values, in the source or target data; corresponds to the list of Allowed
Values on the tab (of the same name) for appropriate nodes in the
Schema.
These options only become available when the Enable validation checks
checkbox has been selected on the object's editor. Each validation rule,
when enabled, has four possible values that can be assigned to it
- Hard Error - This forces an error on the Execute Transformation
task. Once this error occurs, validation stops.
- Soft Error - This forces an error on the Execute Transformation
task, but continues validation of the complete document, or until a
Hard error is found.
- Diagnostic - This provides a warning, but does not force an
error.
- Informational - This may provide a message of possible interest,
but does not force an error.
-
To set up debugging parameters for transformations, select the available check
boxes in the General section. Options include: